

In my previous post about Git worktrees, I showed how to run multiple AI agents in parallel, each working on different features in separate worktrees. Aspire is a game-changer for AI-assisted development because it gives your agents superpowers: with a single Program.cs, an agent can spawn an entire distributed system—backend APIs, Python services, frontends, databases, message queues—everything orchestrated and ready to test. Even better, using Aspire’s MCP server, agents can programmatically query resource status, retrieve logs, and troubleshoot issues. This means AI agents can interact with the whole system, not just individual components, dramatically simplifying development workflows.
But there’s a critical problem when you want to scale to multiple worktrees: port conflicts. When you try to run Aspire AppHost from multiple worktrees simultaneously, they all fight over the same ports, making parallel AI agent development impossible.
I solved this by adding an isolation layer that automatically allocates unique ports for each worktree. While I implemented this with scripts and a clever MCP proxy, I hope the Aspire team will bake this capability directly into the Aspire CLI as part of an aspire run --isolated command—making multi-instance isolation a first-class feature.
Why Aspire is Perfect for AI Agents
Before diving into the port isolation problem, let me explain why Aspire is such a powerful tool for AI-assisted development:
1. Spawn Entire Systems with Minimal Code
An AI agent can create a complete distributed application with just a few lines:
1
2
3
4
5
6
7
8
9
10
11
12
13
14
15
16
17
18
19
20
21
22
23
24
25
26
var builder = DistributedApplication.CreateBuilder(args);

var cache = builder.AddRedis("cache");
var db = builder.AddPostgres("db").AddDatabase("notetakerdb");
var messaging = builder.AddRabbitMQ("messaging");

var backend = builder.AddProject<Projects.Backend>("backend")
    .WithReference(cache)
    .WithReference(db)
    .WithReference(messaging)
    .WithHttpEndpoint(name: "http")
    .WithExternalHttpEndpoints();

var aiService = builder.AddPythonApp("ai-service", "../ai-service", "main.py")
    .WithReference(db)
    .WithReference(messaging)
    .WithHttpEndpoint(env: "PORT", name: "http")
    .WithExternalHttpEndpoints();

builder.AddJavaScriptApp("frontend", "../frontend")
    .WithReference(backend)
    .WithReference(aiService.GetEndpoint("http"))
    .WithHttpEndpoint(env: "PORT")
    .WithExternalHttpEndpoints();

builder.Build().Run();
This spins up:
- Redis cache
- PostgreSQL database
- RabbitMQ message broker
- C# backend API
- Python AI service
- JavaScript frontend
- All networking between them configured automatically
An AI agent can modify this, run it, test the whole system, and iterate—all autonomously.
2. System-Wide Observability via Aspire MCP
Aspire’s MCP (Model Context Protocol) support lets AI agents interact with the running system:
1
2
3
4
5
6
7
8
9
10
11
Agent: "Check if all resources are healthy"
→ Uses list_resources tool
→ Gets status of all services, containers, and executables

Agent: "Why is the backend failing?"
→ Uses list_console_logs tool for backend
→ Reads startup errors and stack traces

Agent: "Show me traces for slow requests"
→ Uses list_traces tool
→ Analyzes distributed tracing data
This is transformative: instead of debugging individual components, agents can reason about the entire system, following request flows across services, correlating logs, and identifying root causes.
Aspire also provides distributed integration testing capabilities that enable agents to run comprehensive tests against the entire system—I’ll cover this later in the post.
The Problem: Port Conflicts Kill Parallelism
This all works beautifully—until you try to run multiple worktrees in parallel. Every AppHost instance tries to grab the same ports:
All worktrees try to use:
- Port 18888 for Aspire Dashboard
- Port 18889 for OTLP (OpenTelemetry) endpoint
- Port 18890 for Resource Service endpoint
- Port 4317 for MCP endpoint
Port Conflict on Startup
Terminal 1 (feature-auth worktree):
1
2
3
cd worktrees-example.worktrees\feature-auth\src\NoteTaker.AppHost
dotnet run
# ✅ Works - Dashboard on port 18888
Terminal 2 (feature-payments worktree):
1
2
3
4
5
cd worktrees-example.worktrees\feature-payments\src\NoteTaker.AppHost
dotnet run
# ❌ ERROR: Port 18888 is already in use!
# ❌ ERROR: Port 18889 is already in use!
# ❌ ERROR: Port 18890 is already in use!
You can’t run the second AppHost at all.
Manual Workarounds Don’t Scale
You could manually edit ports for each worktree, but this is tedious and error-prone:
- ❌ You need to remember which ports are free
- ❌ You have to manually set 3+ environment variables per worktree
- ❌ Cleanup requires tracking which terminals use which ports
- ❌ Biggest problem: Your agent’s MCP connection needs to know which port to connect to
The fundamental issue: your worktrees have isolated code, but shared port space.
The Solution: Port Isolation + MCP Proxy
The solution has two layers:
- Port allocation: Scripts that automatically find and allocate unique ports for each AppHost instance
- MCP proxy: An indirection layer that lets AI agents connect to whichever AppHost is currently running
Layer 1: Automatic Port Allocation
The start-apphost.ps1 and start-apphost.sh scripts:
- Find free ports using .NET’s port allocation
- Set environment variables for Aspire dashboard components
- Launch AppHost with those ports
- Save port configuration to
scripts/settings.jsonfor MCP proxy - Display dashboard URL and Process ID for monitoring
Here’s what the output looks like:

Notice the dynamically allocated ports (54772-54775) saved for the MCP proxy to use.
Layer 2: The MCP Proxy Problem
Here’s the challenge: Aspire’s MCP server runs on a specific port (e.g., 54775) and requires an API key. When using direct HTTP MCP configuration, your AI agent’s configuration (.roo/mcp.json) needs both to be fixed:
1
2
3
4
5
6
7
8
9
10
11
{
  "mcpServers": {
    "aspire-dashboard": {
      "type": "http",
      "url": "http://localhost:62980/mcp",  // ❌ This port is fixed!
      "headers": {
        "x-mcp-api-key": "McpKey"  // ❌ This API key is fixed!
      }
    }
  }
}
The two problems:
- Dynamic Ports: Which port to use?
- Worktree 1’s AppHost MCP is on port 54775
- Worktree 2’s AppHost MCP is on port 61450
- Worktree 3’s AppHost MCP is on port 58232
- Dynamic API Keys: Each AppHost generates a unique API key for security
Your .roo/mcp.json can’t know either value in advance!
Solution: The aspire-mcp-proxy
The aspire-mcp-proxy.cs script adds the missing layer of indirection:
1
2
3
4
5
6
7
8
9
┌─────────────┐         ┌──────────────────┐         ┌─────────────────┐
│ Roo AI      │ stdio   │ aspire-mcp-proxy │  HTTP   │ Aspire AppHost  │
│ Agent       ├────────►│ (fixed config)   ├────────►│ (dynamic port)  │
│             │         │                  │         │                 │
└─────────────┘         └──────────────────┘         └─────────────────┘
                              ↓
                        reads from
                        scripts/settings.json
                        (updated by start-apphost.ps1)
How it works:
- AI agent connects to proxy via stdio (always the same configuration)
- Proxy reads
scripts/settings.jsonto discover the current AppHost’s MCP port - Proxy forwards MCP requests to the correct dynamic port via HTTP
- Responses flow back through the proxy to the agent
In .roo/mcp.json:
1
2
3
4
5
6
7
8
9
{
  "mcpServers": {
    "aspire-mcp": {
      "command": "dotnet",
      "args": ["scripts/aspire-mcp-proxy.cs", "--no-build"],
      "description": "Aspire Dashboard MCP stdio proxy"
    }
  }
}
Note: I’m using .NET 10’s single-file script feature—dotnet run app.cs runs a C# file directly without needing a project file. This makes the proxy incredibly simple: one 272-line file that’s both an MCP client (connecting to Aspire) and an MCP server (exposing tools to Roo), all using the official ModelContextProtocol@0.4.1-preview.1 NuGet package. It’s amazing to have a complete bidirectional MCP proxy in a single, self-contained script!
The proxy configuration is fixed—it doesn’t need to know which AppHost is running! The scripts/settings.json file bridges the gap:
1
2
3
4
5
{
  "port": "54775",
  "apiKey": "abc123...",
  "lastUpdated": "2025-11-15T10:30:00Z"
}
Every time you run start-apphost.ps1, it updates settings.json with the new ports. The proxy reads it dynamically on each request. Also, it sets the AppHost__McpApiKey envvar for the apphost so we can control the token that will be sued for the Aspire MCP server
Putting It All Together
1
2
3
4
5
6
7
8
9
10
11
12
13
14
15
16
17
18
19
20
21
22
23
1. cd worktrees-example.worktrees/feature-auth
2. ./scripts/start-apphost.ps1
   → Finds free ports: 54772-54775
   → Updates scripts/settings.json with port 54775
   → Starts AppHost on those ports

3. Roo connects to aspire-mcp-proxy (via .roo/mcp.json)
   → Proxy reads scripts/settings.json
   → Discovers AppHost MCP is on port 54775
   → Forwards all MCP requests there

4. Roo asks: "list_resources"
   → Goes through proxy → AppHost MCP on 54775
   → Returns resource status

5. Switch to different worktree:
   cd ../feature-payments
   ./scripts/start-apphost.ps1
   → Finds free ports: 61447-61450
   → Updates scripts/settings.json with port 61450

6. Roo's next request automatically goes to port 61450
   → No configuration change needed!
This is the key insight: by adding the proxy layer, we decouple the AI agent’s configuration from the dynamic port allocation. The agent always talks to the same proxy, and the proxy figures out where the current AppHost is running.
Implementation: Using the Scripts
Let me show you how to set this up for the NoteTaker example application:
Step 1: Configure AppHost for Worktree Detection
In your Program.cs, detect the Git folder name and customize the dashboard name:
1
2
3
4
5
6
7
8
9
10
11
12
13
14
15
16
17
18
19
20
21
22
23
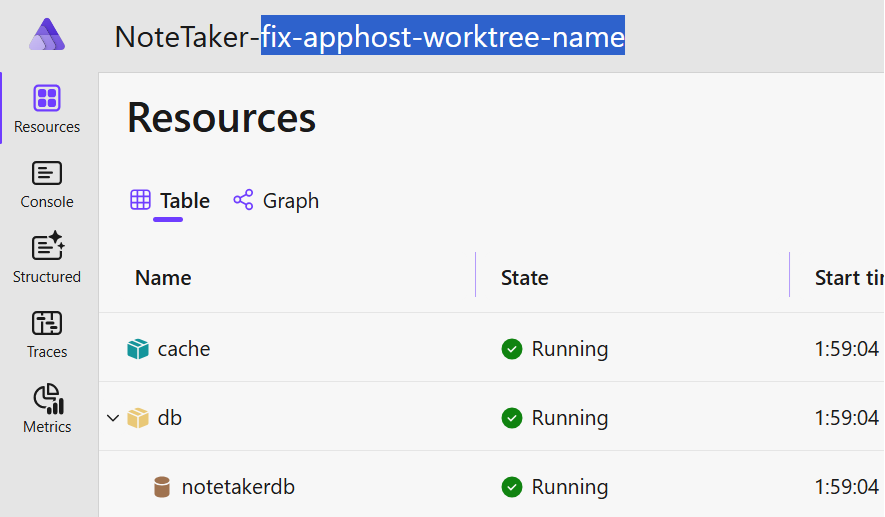
var gitFolderName = GitFolderResolver.GetGitFolderName();
var dashboardAppName = string.IsNullOrEmpty(gitFolderName)
? "NoteTaker"
: $"NoteTaker-{gitFolderName}";
var builder = DistributedApplication.CreateBuilder(new DistributedApplicationOptions()
{
Args = args,
DashboardApplicationName = dashboardAppName,
});
var cache = builder.AddRedis("cache");
var db = builder.AddPostgres("db").AddDatabase("notetakerdb");
var messaging = builder.AddRabbitMQ("messaging");
var backend = builder.AddProject<Projects.Backend>("backend")
.WithReference(cache)
.WithReference(db)
.WithReference(messaging)
.WithHttpEndpoint(name: "http") // ✅ No port = random allocation
.WithExternalHttpEndpoints();
builder.Build().Run();
Key benefits:
GitFolderResolver.GetGitFolderName()detects if you’re in a worktree- Dashboard shows
NoteTaker-feature-authfor feature-auth worktree WithHttpEndpoint()without port allocates random ports
By setting the DashboardApplicationName property of the DistributedApplicationBuilder we can make it clear in the dashboard in which worktree are we working on.
Step 2: Start AppHost with Scripts
Never run dotnet run directly. Always use the management scripts:
PowerShell (Windows)
1
2
3
4
5
6
7
cd worktrees-example.worktrees\feature-auth
.\scripts\start-apphost.ps1

# Output shows:
# - Dashboard URL with unique port
# - MCP endpoint saved to settings.json
# - Process ID for cleanup
Bash (Linux/macOS or Git Bash)
1
2
cd worktrees-example.worktrees/feature-auth
./scripts/start-apphost.sh
The script:
- Finds 4 free ports
- Sets environment variables
- Updates
scripts/settings.jsonwith MCP port and API key - Launches AppHost
- Returns Process ID for cleanup
Step 3: Configure MCP Proxy in .roo/mcp.json
Add the proxy to your .roo/mcp.json:
1
2
3
4
5
6
7
8
9
10
11
12
13
14
15
16
17
18
{
  "mcpServers": {
    "aspire-mcp": {
      "command": "dotnet",
      "args": ["scripts/aspire-mcp-proxy.cs", "--no-build"],
      "env": {},
      "description": "Aspire Dashboard MCP stdio proxy",
      "alwaysAllow": [
        "list_resources",
        "execute_resource_command",
        "list_traces",
        "list_trace_structured_logs",
        "list_console_logs",
        "list_structured_logs"
      ]
    }
  }
}
No ports to configure! The proxy reads scripts/settings.json dynamically.
Step 4: Run Multiple Worktrees Simultaneously
Now you can run as many worktrees as you need:
Terminal 1 - Feature Auth:
1
2
3
4
5
cd worktrees-example.worktrees\feature-auth
.\scripts\start-apphost.ps1
# Dashboard: https://localhost:54772
# MCP: port 54775 (saved to settings.json)
# Process ID: 12345
Terminal 2 - Feature Payments:
1
2
3
4
5
cd worktrees-example.worktrees\feature-payments
.\scripts\start-apphost.ps1
# Dashboard: https://localhost:61447
# MCP: port 61450 (saved to settings.json)
# Process ID: 67890
Terminal 3 - Feature UI:
1
2
3
4
5
cd worktrees-example.worktrees\feature-ui
.\scripts\start-apphost.ps1
# Dashboard: https://localhost:58229
# MCP: port 58232 (saved to settings.json)
# Process ID: 11223
All three run simultaneously with zero conflicts! Your AI agent automatically connects to whichever one you’re working in.
Step 5: Cleanup When Done
Quick Cleanup (Recommended)
1
.\scripts\kill-apphost.ps1 -All
1
./scripts/kill-apphost.sh --all
This terminates all AppHost processes from your repository.
Enabling AI Agents to Work Independently
One powerful benefit is that AI agents can now work completely autonomously, including testing their own changes. I’ve documented the AppHost management rules in .roo/rules/05-apphost-management.md which instructs Roo (my AI coding agent) on:
- Always use
start-apphost.ps1/.sh - How to use MCP tools to check resource status
- Troubleshooting steps when resources fail
- Cleanup procedures using
kill-apphost.ps1 -All
With these rules, I can ask Roo to:
- Make code changes
- Start the AppHost to test
- Use MCP tools to verify functionality
- Check logs if something fails
- Clean up when done
The agent works completely autonomously, even running and testing multiple worktrees in parallel.
Script Reference
| Script | Purpose |
|---|---|
start-apphost.ps1 / .sh | Start AppHost with auto port allocation, update settings.json |
aspire-mcp-proxy.cs | MCP proxy that reads settings.json and forwards to current AppHost |
kill-apphost.ps1 / .sh | Kill AppHost instances (by PID or all) |
list-apphosts.ps1 / .sh | List all running instances |
Environment Variables Set by Scripts:
1
2
3
4
$env:ASPIRE_DASHBOARD_PORT = "54772"                              # Dynamic
$env:ASPIRE_DASHBOARD_OTLP_HTTP_ENDPOINT_URL = "http://localhost:54773"
$env:ASPIRE_RESOURCE_SERVICE_ENDPOINT_URL = "http://localhost:54774"
$env:ASPIRE_DASHBOARD_MCP_ENDPOINT_URL = "http://localhost:54775"  # Saved to settings.json
Benefits
1. True AI Agent Superpowers
Combine Aspire’s system orchestration with MCP observability:
- ✅ Agents spawn entire distributed systems
- ✅ Agents query resource status programmatically
- ✅ Agents read logs and traces to debug
- ✅ Agents work on whole systems, not just components
2. Zero Configuration MCP Connections
The proxy solves the dynamic port problem:
- ✅
.roo/mcp.jsonis fixed (no per-worktree configuration) - ✅ Proxy automatically finds current AppHost
- ✅ Works seamlessly across worktree switches
- ✅ No manual port tracking needed
3. True Parallel Development
Multiple agents work simultaneously:
- ✅ No “wait for Agent A to finish”
- ✅ No manual port coordination
- ✅ Each agent completely independent
4. Works with Any Aspire Project
- ✅ Standard Aspire features only
- ✅ No custom NuGet packages
- ✅ Simple script-based approach
Aspire’s Built-in Distributed Testing Support
Beyond orchestration and observability, Aspire provides distributed testing capabilities that enable true end-to-end testing with automatic port isolation. Instead of just running the AppHost, your AI agent can now run comprehensive tests against the entire system.
Using DistributedApplicationTestingBuilder, you can spin up your full application stack—frontend, backend, databases, message queues—with automatically randomized ports for complete isolation:
1
2
3
4
5
6
7
8
9
10
11
var appHost = await DistributedApplicationTestingBuilder
    .CreateAsync<Projects.NoteTaker_AppHost>();

var app = await appHost.BuildAsync();
await app.StartAsync();

// Wait for resources to be healthy
await app.ResourceNotifications.WaitForResourceHealthyAsync("frontend");

// Get dynamically allocated endpoint
var frontendUrl = app.GetEndpoint("frontend");
Combine this with Playwright and you achieve true end-to-end tests:
1
2
3
4
5
6
7
8
9
10
11
// Get the dynamically allocated frontend URL
var frontendUrl = app.GetEndpoint("frontend").ToString();

// Use Playwright to interact with the UI
var page = await browser.NewPageAsync();
await page.GotoAsync(frontendUrl);

// Test the actual UI with all dependencies running
await page.FillAsync("#title", "Test Task");
await page.ClickAsync("button[type='submit']");
await page.WaitForSelectorAsync(".task-item");
In the NoteTaker example, tests interact with the actual frontend UI while all backend services, databases, and dependencies run in the background—all with isolated, randomly allocated ports.
This means your AI agent is now truly autonomous: it can modify code, run the full test suite with all system dependencies, and validate changes end-to-end without manual intervention. Read more about accessing resources in tests.
Under the Hood: How the MCP Proxy Works
The aspire-mcp-proxy.cs is the heart of the solution. Let me explain how it’s implemented.
The Dual Nature: MCP Client + MCP Server
The proxy is simultaneously:
- MCP Server (stdio) - Exposes tools to Roo via standard input/output
- MCP Client (HTTP) - Connects to Aspire’s MCP server to invoke tools
Here’s the architecture:
1
2
3
4
5
6
7
8
9
10
11
12
13
14
15
16
17
18
19
20
21
22
23
24
┌─────────────────────────────────────────────────────────────────┐
│ aspire-mcp-proxy.cs (272 lines, single file)                    │
│                                                                  │
│  ┌────────────────────┐         ┌─────────────────────┐        │
│  │ MCP Server (stdio) │◄────────┤ Roo Agent           │        │
│  │ - Exposes tools    │         │ (sends tool calls)  │        │
│  │ - Handles requests │         └─────────────────────┘        │
│  └────────┬───────────┘                                         │
│           │                                                     │
│           ▼                                                     │
│  ┌────────────────────┐                                         │
│  │ ProxyTool          │  For each tool:                         │
│  │ - Wraps downstream │  1. Read settings.json                  │
│  │ - Reads settings   │  2. Create HTTP client                  │
│  │ - Forwards calls   │  3. Forward request to Aspire           │
│  └────────┬───────────┘  4. Return response                     │
│           │                                                     │
│           ▼                                                     │
│  ┌────────────────────┐                                         │
│  │ MCP Client (HTTP)  │────────► Aspire Dashboard MCP           │
│  │ - Connects to port │         (dynamic port from settings)    │
│  │ - Invokes tools    │                                         │
│  └────────────────────┘                                         │
└─────────────────────────────────────────────────────────────────┘
Key Implementation Details
1. Dynamic Settings Loading
The proxy reads scripts/settings.json on every request to get the current AppHost’s port and API key:
1
2
3
4
5
6
7
8
9
10
11
12
13
14
async Task<McpClient> CreateClientAsync()
{
    var current = await LoadSettingsAsync(settingsPath);
    var transport = new HttpClientTransport(new()
    {
        Endpoint = new Uri($"http://localhost:{current.Port}/mcp"),
        AdditionalHeaders = new Dictionary<string, string>
        {
            ["x-mcp-api-key"] = current.ApiKey!,
            ["Accept"] = "application/json, text/event-stream"
        }
    });
    return await McpClient.CreateAsync(transport);
}
2. Tool Caching for Offline Mode
When the proxy starts, it attempts to connect to Aspire and cache the available tools. If Aspire isn’t running, it uses cached tool metadata:
1
2
3
4
5
6
7
8
9
10
11
12
13
14
15
16
try
{
    var client = await CreateClientAsync();
    await cache.RefreshAsync(client);
    // Online mode: use live tools
    tools = cache.GetTools().Select(t => new ProxyTool(CreateClientAsync, t));
}
catch (Exception ex)
{
    await Console.Error.WriteLineAsync($"[AspireMcpProxy] Connection failed: {ex.Message}");
    await Console.Error.WriteLineAsync("[AspireMcpProxy] Using cached tools");

    var cachedTools = await cache.LoadAsync();
    // Offline mode: create tools from cached metadata
    tools = cachedTools.Select(t => new ProxyTool(CreateClientAsync, t));
}
This means Roo can see Aspire tools even before starting AppHost, though they’ll fail if invoked while offline.
3. ProxyTool: The Forwarding Logic
Each tool exposed by the proxy is a ProxyTool that:
- Accepts stdio requests from Roo
- Reads current settings
- Creates an HTTP client
- Forwards to Aspire’s MCP server
- Returns the response
1
2
3
4
5
6
7
8
9
10
11
12
13
14
15
16
17
18
19
20
21
22
public override async ValueTask<CallToolResult> InvokeAsync(
    RequestContext<CallToolRequestParams> request,
    CancellationToken ct = default)
{
    var args = request.Params?.Arguments?
        .ToDictionary(kv => kv.Key, kv => (object?)kv.Value)
        ?? new Dictionary<string, object?>();

    await Console.Error.WriteLineAsync($"[ProxyTool] Calling {_tool.Name}");

    try
    {
        var client = await _clientFactory();  // Reads settings.json
        var result = await client.CallToolAsync(_tool.Name, args, null);
        await Console.Error.WriteLineAsync($"[ProxyTool] {_tool.Name} completed");
        return result;
    }
    catch (HttpRequestException ex)
    {
        return Error($"Connection failed: {ex.Message}\n\nVerify Aspire is running.");
    }
}
4. Environment Variable Priority
Settings are resolved in priority order:
ASPIRE_MCP_PORTenvironment variable (highest priority)settings.jsonfile (updated by scripts)
Same for API key:
ASPIRE_MCP_API_KEYenvironment variablesettings.jsonfile
This design allows flexibility: you can override settings via environment variables if needed, but the default behavior reads from the file updated by start-apphost.ps1.
Why Single-File Script is Perfect
Using .NET 10’s dotnet run app.cs feature makes this solution incredibly elegant:
1
2
# No project file needed - just run the .cs file!
dotnet run scripts/aspire-mcp-proxy.cs
The #:package directives at the top automatically restore NuGet packages:
1
2
3
#:package ModelContextProtocol@0.4.1-preview.1
#:package Microsoft.Extensions.Hosting@10.0.0
#:package Microsoft.Extensions.Logging@10.0.0
This is the power of modern .NET—a complete MCP proxy in a single, readable script file!
Conclusion
Aspire + MCP gives AI agents unprecedented capabilities: they can spawn entire distributed systems and interact with them programmatically. But this power only scales when you solve the port isolation problem.
The solution combines two layers:
- Port allocation scripts that automatically find free ports
- MCP proxy that provides indirection so AI agents don’t need to know which port to use
The key enablers are:
- Scripts that allocate unique ports and save to
settings.json aspire-mcp-proxy.csthat readssettings.jsondynamicallyGitFolderResolverfor unique dashboard namesWithHttpEndpoint()for random service ports
While I’ve implemented this with scripts, I encourage the Aspire team to add this as a built-in feature. Imagine:
1
2
3
4
5
6
7
8
# Future vision: Native Aspire CLI support
aspire run --isolated

# Aspire automatically:
# - Detects worktree context
# - Allocates unique ports
# - Updates MCP proxy configuration
# - Manages cleanup on exit
Until then, the scripts in the worktrees-example repository provide everything you need.
This approach transformed my AI agent workflow from sequential (one at a time) to truly parallel (four agents simultaneously). The combination of Git worktrees + Aspire orchestration + MCP observability + port isolation is a game-changer for AI-assisted development at scale.
Example Repository: Check out the complete implementation at worktrees-example with the NoteTaker application, all management scripts, and the MCP proxy.
Running multiple Aspire instances with AI agents? How are you handling MCP connections? Share your approach in the comments!
Related Posts
- Scaling Your AI Development Team with Git Worktrees - The foundation for parallel AI development
Seamless Private NPM Feeds in .NET Aspire - Handling private packages in Aspire
- Give Your AI Coding Agent Eyes with Playwright MCP - Visual testing for AI agents